

首先看一个springboot项目的配置,我们可以定义一个application.yml,对于不同的环境有时也通过profile配置项指定不同的配置文件(譬如application-dev.yml),也可以通过命令行覆写具体的VM options配置项(举个栗子,启动时执行 java -jar xxx.jar --server.port=8080),此文讲解这些配制的读取原理。
配置优先级
整体配置项的优先级从高到低为:
命令行配置;
系统属性(System.getProperties())
系统环境变量
jar包外的主配置文件(带有)
jar包内的主配置文件
jar包外的次要配置文件(由spring.profile指定的)
jar包内的次要配置文件(由spring.profile指定的)
启动类主方法
跟随Springboot的启动类run()方法,来看看他做了什么
public ConfigurableApplicationContext run(String... args) {
    StopWatch stopWatch = new StopWatch();
    stopWatch.start();
    ConfigurableApplicationContext context = null;
    Collection<SpringBootExceptionReporter> exceptionReporters = new ArrayList();
    this.configureHeadlessProperty();
    SpringApplicationRunListeners listeners = this.getRunListeners(args);
    listeners.starting();

    Collection exceptionReporters;
    try {
        ApplicationArguments applicationArguments = new DefaultApplicationArguments(args);
        //这个方法是重点
        ConfigurableEnvironment environment = this.prepareEnvironment(listeners, applicationArguments);
        this.configureIgnoreBeanInfo(environment);
        Banner printedBanner = this.printBanner(environment);
        context = this.createApplicationContext();
        exceptionReporters = this.getSpringFactoriesInstances(SpringBootExceptionReporter.class, new Class[]{ConfigurableApplicationContext.class}, context);
        this.prepareContext(context, environment, listeners, applicationArguments, printedBanner);
        this.refreshContext(context);
        this.afterRefresh(context, applicationArguments);
        stopWatch.stop();
        if (this.logStartupInfo) {
            (new StartupInfoLogger(this.mainApplicationClass)).logStarted(this.getApplicationLog(), stopWatch);
        }

        listeners.started(context);
        this.callRunners(context, applicationArguments);
    } catch (Throwable var10) {
        this.handleRunFailure(context, var10, exceptionReporters, listeners);
        throw new IllegalStateException(var10);
    }

    try {
        listeners.running(context);
        return context;
    } catch (Throwable var9) {
        this.handleRunFailure(context, var9, exceptionReporters, (SpringApplicationRunListeners)null);
        throw new IllegalStateException(var9);
    }
}
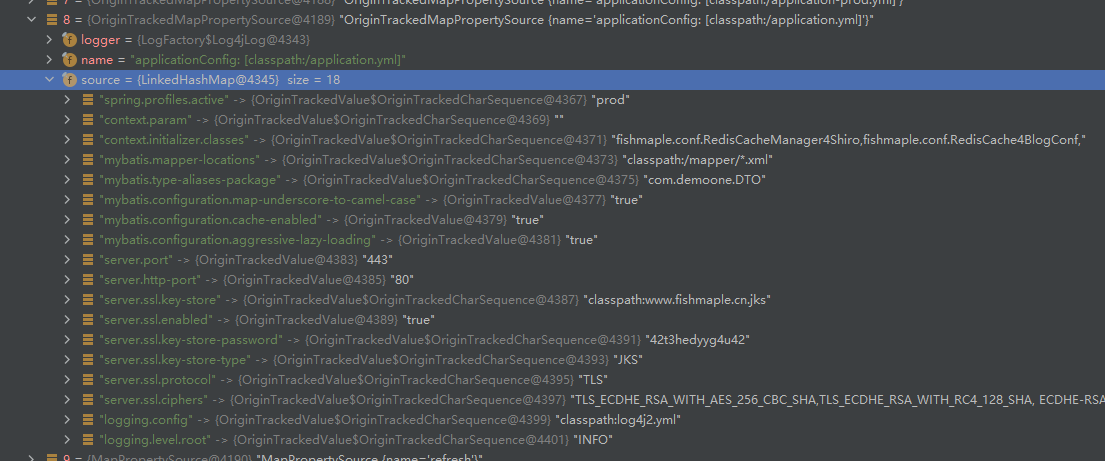
我们注意到在执行了prepareEnvironment方法后返回了environment对象,如果我们在此处打断点进行debug,可以发现这个对象其实就是配置的内容,environment对象包含了一个propertySources的对象,里面有一个list属性,在这里我们制定了一个自定义的启动参数(--server.port=xxxx):

例如我们展开其中的第9项,就会看到application.yml转化为的配置。
prepareEnvironment
所以配置文件的初始化其实是在prepareEnvironment方法:
private ConfigurableEnvironment prepareEnvironment(
      SpringApplicationRunListeners listeners,
      ApplicationArguments applicationArguments) {
   // Create and configure the environment
   ConfigurableEnvironment environment = getOrCreateEnvironment();
   //到这里加载完了上面的2 3 4 5
   configureEnvironment(environment, applicationArguments.getSourceArgs());
   //到这里加载完了上面的0 1
   listeners.environmentPrepared(environment);
   //到这里全部加载完
   bindToSpringApplication(environment);
   if (this.webApplicationType == WebApplicationType.NONE) {
      environment = new EnvironmentConverter(getClassLoader())
            .convertToStandardEnvironmentIfNecessary(environment);
   }
   ConfigurationPropertySources.attach(environment);
   return environment;
}

private ConfigurableEnvironment getOrCreateEnvironment() {
   if (this.environment != null) {
      return this.environment;
   }
   //一般都为tomcat的servlet容器,进入该分支
   if (this.webApplicationType == WebApplicationType.SERVLET) {
      return new StandardServletEnvironment();
   }
   return new StandardEnvironment();
}
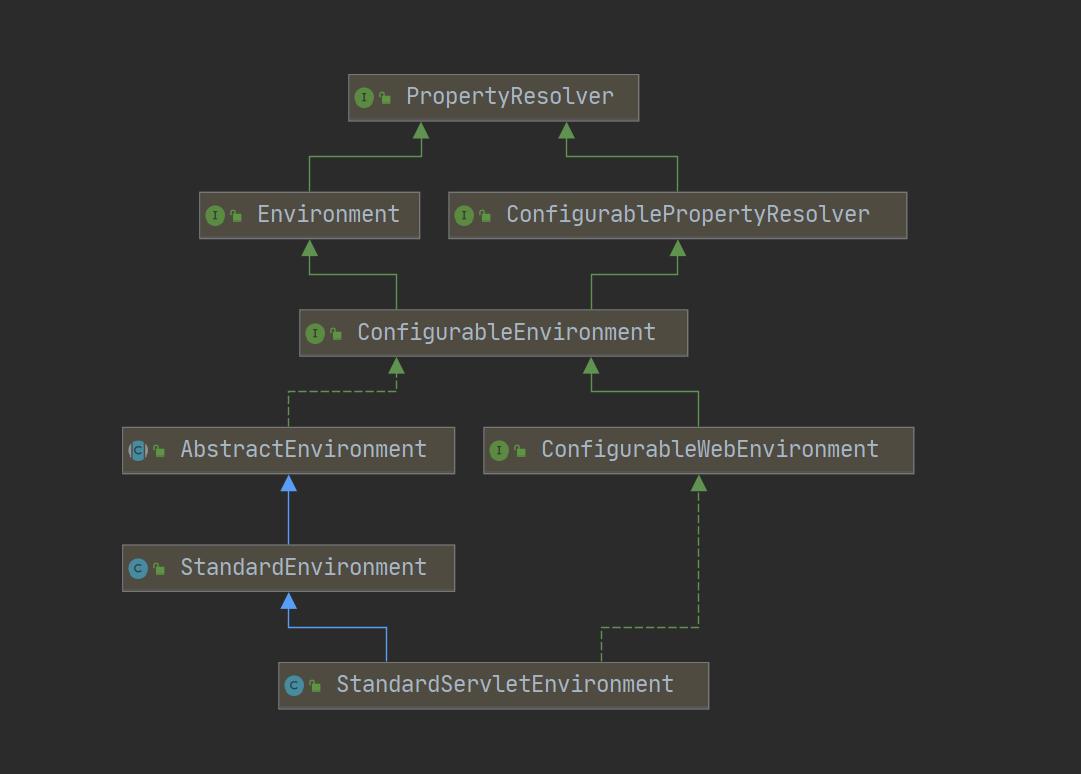
在getOrCreateEnvironment方法中初始化了一些基本的source们,这里借助了模板方法的实现,可以看到上面生成的其实是StandardServletEnvironment的实例,他的继承关系如下:
实例化过程在AbstractEnvironment中:
public AbstractEnvironment() {
   //这个方法交由子类实现了
   customizePropertySources(this.propertySources);
   if (logger.isDebugEnabled()) {
      logger.debug("Initialized " + getClass().getSimpleName() + " with PropertySources " + this.propertySources);
   }
}

/**
  *   StandardServletEnvironment 中
  *   这里的MutablePropertySources 继承于Iterable,可以理解为一个有序的resource list
  */
@Override
protected void customizePropertySources(MutablePropertySources propertySources) {
   //addLast顾名思义是插入优先级最低的资源
   //对应上面source第2
   propertySources.addLast(new StubPropertySource(SERVLET_CONFIG_PROPERTY_SOURCE_NAME));
   //对应上面source第3
   propertySources.addLast(new StubPropertySource(SERVLET_CONTEXT_PROPERTY_SOURCE_NAME));
   if (JndiLocatorDelegate.isDefaultJndiEnvironmentAvailable()) {
      propertySources.addLast(new JndiPropertySource(JNDI_PROPERTY_SOURCE_NAME));
   }
   //这里调用了StandardEnvironment的方法
   super.customizePropertySources(propertySources);
}
/**
  *   StandardEnvironment 中
  *   这里的MutablePropertySources 继承于Iterable,可以理解为一个有序的resource list
  */
@Override
protected void customizePropertySources(MutablePropertySources propertySources) {
   //对应上面source第4
   propertySources.addLast(new MapPropertySource(SYSTEM_PROPERTIES_PROPERTY_SOURCE_NAME, getSystemProperties()));
   //对应上面source第5
   propertySources.addLast(new SystemEnvironmentPropertySource(SYSTEM_ENVIRONMENT_PROPERTY_SOURCE_NAME, getSystemEnvironment()));
}
configureEnvironment-载入命令行
上文中prepareEnvironment的configureEnvironment方法传入了命令行参数,将上文中1配置项加载进去:
protected void configurePropertySources(ConfigurableEnvironment environment,
      String[] args) {
   MutablePropertySources sources = environment.getPropertySources();
   if (this.defaultProperties != null && !this.defaultProperties.isEmpty()) {
      sources.addLast(
            new MapPropertySource("defaultProperties", this.defaultProperties));
   }
   //有命令行的时候才会有这个配置
   if (this.addCommandLineProperties && args.length > 0) {
      String name = CommandLinePropertySource.COMMAND_LINE_PROPERTY_SOURCE_NAME;
      //创建source并遍历配置项解析插入
      if (sources.contains(name)) {
         PropertySource<?> source = sources.get(name);
         CompositePropertySource composite = new CompositePropertySource(name);
         composite.addPropertySource(new SimpleCommandLinePropertySource(
               "springApplicationCommandLineArgs", args));
         composite.addPropertySource(source);
         sources.replace(name, composite);
      }else {
         //优先级是首位
         sources.addFirst(new SimpleCommandLinePropertySource(args));
      }
   }
}
listeners载入配置
通过上面的步骤后已经加载出了下面的五类配置项,其实这里除了命令行就是系统变量,还没有我们自己定义的配置文件中的配置。

 2021-03-09鱼鱼