

本文旨在快速入门Elasticsearch的分词,包括分词分析器的创建和介绍对比等,请确保在阅读前已经搭建好完备的集群。文章基于es7.0+,与稍旧版本的主要区别是没有type。
分词过程
在讨论分词前,我们先看一下es整体创建倒排的分词过程:
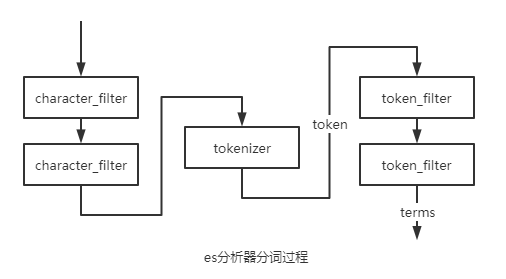
我们常说的分词器指的其实是“分析器”analyzer,es将以上常用的逻辑封装起来成为analyzer,但是语义上的分词器是指上面的tokenizer。
经过了三层处理后拿到了terms数组建立最终的倒排索引:
character filter:一般不会用到这个filter,是在分词前对原有的文档字段内容做转换,例如去除html的标签提取出正文内容,按正则清除和替换某些内容,你可以指定及自定义0个到多个character filter,他们将共同存在,一个文本流在经过character filter处理后,依然是文本流;
tokenizer:分词器,是Analyzer的核心,要求有且只有一个,它规定了语句的切分规则,利用tokenizer拆分后的文本可被称作token,只使用单一的tokenizer就可以构造最简单的analyzer了;
token filter:在获取token集合后,再利用token filter进行过滤和转化从而得到最终的分词倒排集合(我们称结果集合中的元素为term),例如转换大小写,处理停用词(一些被忽略并当做分隔符的词汇)等。
特别地,对于不可分词的keyword,也有其专属的处理器,被称作normalizer。
一般说来,指定的既有分析器和一些开源的分析器(例如ik分析器)已经能够处理大部分搜索情况,在使用时直接创建相应的field即可。有时根据具体业务形态,可能也要对分词方式做出改变,此时才需要自己定制一套分词规则。
API——创建指定分词的字段、测试分词
本段记录相关的API。
创建mapping和index
在创建mapping/type时,我们可以手动的指定一个字段使用哪些分词方式,同个field如果使用多个分词方式其在使用上视为多个字段。接下来,让我们先创建一个名为test_index的index,因为是单机测试,所以此处只额外的备份数为0,使用5个分片,刷新间隔30s:(index这一层级其实省略也可)
curl -X PUT "localhost:9200/test_index" -H 'Content-Type: application/json' -d'
{
	"settings": {
		"index":{
			"refresh_interval": "30s",
			"number_of_shards": "5",
			"number_of_replicas": "0"
		}
	}
}
'
接下来创建一个测试的mapping,其实可以在创建index时直接指定,我们指定了两个数据类型为text的field,此时并未定义它的分词方式,es会为他分配默认的standard解析器(url已经指定了type为_doc,这也是7.0后固定的type),因为已经创建完了index,所以只能在_doc端点执行修改的POST请求:
curl -X POST "localhost:9200/test_index/_mapping/_doc" -H 'Content-Type: application/json' -d'
{
	"properties": {
	    "name": { "type": "text" },
	    "email": { "type": "keyword" },
	    "content": { "type": "text" ,"analyzer":"simple"},
	    "tweeted_at": { "type": "date" }
	}
}
'
其中content使用了simple的analyzer,而name字段使用了默认的standard的analyzer。
为index指定自定义analyzer或normalizer
对于已经建立了索引的index,需要先将其关闭才能新增自定义analyzer,当然可以在创建index时直接指定:
curl -X POST "localhost:9200/test_index/_close"
然后可以创建自定义分词器和过滤器的analyzer,这里创建了一个名为my_analyzer的分析器,并为其指定了tokenizer和filters,其中tokenizer为必选,其余均可为0到多个:
curl -X PUT "localhost:9200/test_index/_settings" -H 'Content-Type: application/json' -d'
{
	 "analysis": {
	    	"analyzer": {
	        	"my_analyzer":{
					"tokenizer":"standard",
					"filter":["standard", "lowercase", "stop"],
					"char_filter":  [ "html_strip" ]
	                }
	        }
	 }
}
'
也可以指定一个normalizer:
curl -X PUT "localhost:9200/test_index/_settings" -H 'Content-Type: application/json' -d'
{
	  "analysis": {
	         "normalizer": {
		        "my_normalizer": {
		          "filter": ["lowercase", "asciifolding"]
		        }
		  }

	  }
}
'
其后记得再打开index:
curl -X POST "localhost:9200/test_index/_open"
新增field并指定分析器
我们可以添加新的字段,也可以在原有字段映射新的分析器,但是已有的字段映射是不能修改的 包括分析器和数据类型,因为倒排索引是已经建好的,我们为content指定了一个新的whitespace的分析器映射,名也为whitespace(使用时为content.whitespace):
curl -X PUT "localhost:9200/test_index/_mapping/_doc" -H 'Content-Type: application/json' -d'
{
	"properties": {
	    "content": {
	    	"type": "text",
	    	"analyzer":"simple",
	    	"fields":{
	    		"whitespace":{
	    			"type":"text",
	    			"analyzer":"whitespace"
	    		}
	    	}
	    }

	}
}
测试分析、分词器
可以测试各种分词、分析器的效果:
curl -X GET "localhost:9200/{index}/_analyze" -H 'Content-Type: application/json' -d'
{
  "analyzer" : "standard",
  "text" : "Quick Brown Foxes!"
}
'
上面指定了一个analyzer,其中的index是可选的,如果选了index,就可以使用对应index具体字段的分词器。也指定了要分词的content(text),除去text外,其余参数都为选填:
text:待分词的语句,必填;
analyzer:指定使用的分析器,优先级高于tokenizer,如果没有任何除去text的额外参数,则有一个隐性的analyzer:standard;
char_filter:像定义分析器那样指定charfilter;
filter:指定token filter;
field:在指定了index的前提下,可以指定一个字段使用该字段的分词器;
tokenizer:指定分词器;
normalizer:指定规范器,与tokenizer和analyzer相悖。
会返回相应的分词结果,例如:
curl -X GET "localhost:9200/{index}/_analyze" -H 'Content-Type: application/json' -d'
{
  "analyzer" : "english",
  "text" : "Brown Foxes jump into the hole!"
}
'
返回:
{
    "tokens": [
        {
            "token": "brown",
            "start_offset": 0,
            "end_offset": 5,
            "type": "<ALPHANUM>",
            "position": 0
        },
        {
            "token": "fox",
            "start_offset": 6,
            "end_offset": 11,
            "type": "<ALPHANUM>",
            "position": 1
        },
        {
            "token": "jump",
            "start_offset": 12,
            "end_offset": 16,
            "type": "<ALPHANUM>",
            "position": 2
        },
        {
            "token": "hole",
            "start_offset": 26,
            "end_offset": 30,
            "type": "<ALPHANUM>",
            "position": 5
        }
    ]
}
也可以看一下上文中自定义的normalizer的效果:
curl -X GET "localhost:9200/test_index/_analyze" -H 'Content-Type: application/json' -d'
{
    "normalizer" : "my_normalizer",
  "text" : "Brown Foxes jump into the hole!"
}
'
{
    "tokens": [
        {
            "token": "brown foxes jump into the hole!",
            "start_offset": 0,
            "end_offset": 31,
            "type": "word",
            "position": 0
        }
    ]
}
会发现除去过滤效果,其整体是一个token。